Friday, August 9, 2024

Wi-Fi Problem and Solutions


                                                         For More Details Click here

                                                       Wifi Problems And Solutions

If you are prompted for a user name and password, please reset your wifi password before proceeding.

Issue with user name password. Please inform the student the user name and password are available on Swagatham mail. If any students have not received the Swagatham mail, please contact the academic coordinator office. Location(C304 @ AB1)

Due to verification, it is bending that why you have not received the Swagatham mail. 

If you don't know the username and password, if you want to know mail from your student outlook to sysadmin@cb.amrita.edu or else contact 04222685339.(Working Days available 9.00 a.m. to 4.30 p.m.) 

(Note :
You logged in to the official student email ID? That default password is wifi password & roll number only user name. User name is small characters.) 

Not connect pls use this link(Prompting for user identification and authentication credentials. However, the laptop is not being connected.)

UNABLE TO ESTABLISH A CONNECTION BETWEEN THE LAPTOP AND NOT PROMPTING FOR ANY USERNAME OR PASSWORD. PLEASE FOLLOW THESE STEPS.


In this video, it is explained that you cannot connect a laptop without asking for the for the user name and password. You can do this option. 

If not able to connect the Amrita wifi purchase to the USB-to-wifi adapter.


ATTEMPT TO DELETE THE DRIVER FOR THE WIRELESS NETWORK ADAPTER


If the don't validate option is unavailable, use the CA certification option.

If you have a mobile device, the "don't validate" option will be available. You can find out more about the various options on this page.


IF THE DON'T VALIDATE OPTION IS UNAVAILABLE, USE THE CA CERTIFICATION OPTION


Ca Certificate Step by step process (If copy-paste the wifi-credentials automatically, change the setting carefully.)


                                                                       Click here


CA certificate installation
https://intranet.cb.amrita.edu/AmritaWiFiLogin/how-to-connect-wifi-from-latest-android Open your phone's Settings app. Tap Security Advanced. Encryption & credentials. Under "Credential storage," tap Install a certificate. Wi-Fi Certificate. In the top left, tap Menu. Under "Open from," tap where you saved the certificate. Tap the file. ... Enter a name for the certificate. Tap OK. EAP Method: PEAP Phase 2 Authentication: MSCHAPV2 CA Certificate: Newly Added Certificate Online Certificate Status: DO Not Verify Domain: amritanet.edu Identity: VPN / Domain Username Anonymous Identity: Leave Blank Password: VPN / Domain Password Select Save


                              Ubuntu Instructions for connecting to Amrita Campus Wi-Fi


TEST THE SPEED OF YOUR LOCAL WIFI NETWORK


If you find that the speed is very slow, please send an email to campuswifi@cb.amrita.edu  and sysadmin@cb.amrita.edu

The speed of a 2.4G connection is lower. There is a video available that explains how 5G can increase internet speed. You can watch it after completing the task. Once you have completed the task, proceed to assess the local speed

HIGH RESOLUTION.


                                                            LOW RESOLUTION


Go to this link, then check your speedtest on local speed.(Click here)


TO RETRIEVE THE WIFI USERNAME AND PASSWORD, EXECUTE THE FOLLOWING COMMAND 


In this video, it's asking for a for a user name and password but cannot connect the laptop

netsh winsock reset
netsh int ip reset
netsh advfirewall reset

After rebooting the laptop, try to connect Amrita Room wifi. 


           THIS GUIDE PROVIDES INSTRUCTIONS FOR CONNECTING TO THE AMRITA OR                                      AMRITACLASS SSID USING THE INTEL WIFI DRIVER


If you are not able to connect Amrita wifi, you geven these settings in your laptop.


For room wifi using person to buy the modem-ups.

for uninterrupted internet service

                                                     Click here to proceed with your purchase.

                                     MODEM UPS DETAILS
                                                     

How to manually connect to Wi-Fi on Windows

Go to Control panel (Start -----Search button-----control)


Apper to this window 
                                                                                                               
             
Click to Network and Sharing Center Apper to this window
                                                                                                                   

 Click to Set up a new connection or network 

 Select to Manually connect to wireless network netxt  
My device worked with 2.4G as same process 5G.


Amrita-5G-Room Number or Amrita-2.4G-Room number Mostly try to connect 5G to get more efficiënt connectiviteit.

Click to next 

Click to Change Connection Settings select Security

Click to Settings 

Untick this Box after ok
Click to configure 


Untick this option then ok

Click to Advanced Settings


Put it the tick in this box

Click okay

Enter your user name password VPN user Name and password.
Definitely connected to ICTS or Room wifi D401. Once more check with uninstall the wifi driver reinstall once after check.

If connected, but no internet, please check your IP-address.
Start---search cmd click it
Enter this command.
ipconfig /all
If connect Amrita wifi to get 10.series ip
If connect Amrita wifi to get 10.series IP Address
If not get this ip address maybe enter the manual ip address.
To open the administrative command prompt in Windows , first click on the Start icon. In the search dialog box that appears, type cmd and right-click on the cmd search result displayed. On the menu that Windows brings up, click on the Run as administrator option as shown in the below screenshot:
Depending on your User Account Control Settings (UAC), Windows may ask for confirmation. If this happens, simply click on Yes and Windows will present the CLI prompt running in elevated administrator privileged mode:
At the Administrative Command Prompt, type netsh interface ip show config, which will display the network adapters available on your system and their names. 
C:\Windows\system32> netsh interface ip set address "Wireless Network Connection” dhcp
OR

To enable DHCP to obtain a TCP/IP configuration automatically on Windows , use these steps:

Open Settings on Windows.

Click on Network & Internet.

Click on Ethernet or Wi-Fi

Click the network connection.

Under the “IP settings” section, click the Edit button.

                                   or


Open Control Panel.

Click on Network and Internet.

Click on Network and Sharing Center.

On the left pane, click the “Change adapter settings” option.

Right-click the network adapter and select the Properties option.

Select the “Internet Protocol Version 4 (TCP/IPv4)” option.

Click the Properties button.

Select the “Obtain an IP address automatically” option.

Select the “Obtain the following DNS server address automatically” option.

Click the OK button.

After completing the steps, the statically assigned TCP/IP configuration will no longer be available, and the computer will automatically request a dynamic network configuration from the network.

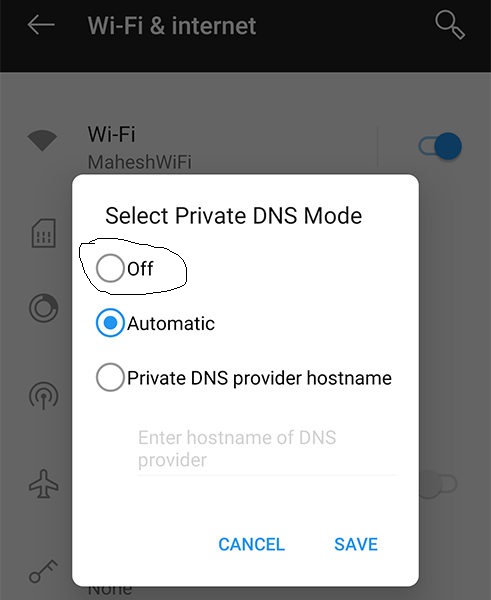
Disabling the private DNS on a mobile device will result in the restoration of internet connectivity.


For New Students

If you have a mobile device, the "don't validate" option will be available. You can find out more about the various options on this page. You can use this option

Manual for configuring android devices to connect to amrita wifi. Step1: For accessing Amrita Wi-Fi on Android devices, you should have Amrita WiFi/VPN/Domain account received in your college Email. Step2: Go to Settings icon on your Android device/mobile. Step3: On the Settings page in Wireless & networks click on Wi-Fi. 


Turned off  the Data Turn on the Wi-Fi
You can see the available wireless networks. Select respective SSID. For example – Amrita.or AmritaClass

In the EAP Method select PEAP.

In Phase-2 authentication select MSCHAPV2.


Leave CA Certificate “None” or select “Do not Validate”.

Select Do not Validate only if the connect option is not Highlighted.


Enter your Amrita WiFi ID in the Identity (i.e. without @cb.students.amrita.edu).

For Example- If the email id is cb.en.u4cse19023@cb.students.amrita.edu, Wi-Fi username/identity would be cb.en.u4cse19023.
Leave the anonymous identity field blank.

 Enter your Amrita Wi-Fi password


 Click on “Advanced options” as shown in the screen shot below.


NOTE: If device has use Randomization feature in privacy then choose Use device MAC instead of Use randomized MAC (default option)
(If select Randamise Mac Adress and connect Amrita wifi every time, it's changed the mac Adress in future. Maybe 2 devices get internetconnection option, will aproch condition be available There maybe disconnected the internetconnectivity in your device.)


Click on Connect to enable the services.


Now the device is connected to ”Amrita” Wi-Fi.


Vasishta Bhavanam, Agasthya Bhavanam, ,Bhrigu Bhavanam, and Kashyapa Bhavanam 
In this hostel, staying students, any issue with modem, please inform your hostel warden, provide your details, and submit the room key. The warden, please send a request to CMS HELPDESK PORTAL.

cms.cb.amrita.edu

The modem is functioning properly as indicated by the green Power and Pon LEDs.


The modem is experiencing a malfunction, as seen by the illuminated green Power and Pon Red LEDs.(Issue with Fiber)


The modem is experiencing a malfunction, as evidenced by the lack of illumination in the Power and Pon LEDs.


Why You Should Try to Use UPS: Ensuring Stability for Your Devices and Network

In today’s digital age, staying connected is not just a convenience; it’s an essential part of both personal and professional life. From students to business professionals, reliable access to the internet and other networks is critical. However, as we increasingly rely on various devices for work, study, and entertainment, ensuring stable and uninterrupted power for these devices becomes crucial. One important step to maintain stability is to try to use UPS due to your room device is connected to the service device, correct? This server is connected to over 470 devices, making a stable power supply vital.

What is a UPS and Why Should You Use One?

A UPS (Uninterruptible Power Supply) is a device that provides emergency power when your main electrical supply fails. It ensures that devices stay connected, and work is not interrupted due to power outages. In environments where multiple devices are interconnected, like your room and a server connected to over 470 devices, a UPS is invaluable. If power goes out even for a few seconds, it could lead to data loss, corrupted files, and unnecessary downtime. That’s why it’s important to try to use UPS due to your room device is connected to the service device, correct? This server is connected to over 470 devices, ensuring you stay online no matter what.

The Importance of Power Backup for Interconnected Devices

In most modern homes, offices, and universities, devices are interconnected through networks, and servers often handle hundreds of connections at any given time. If you are in a shared environment like a dorm room or office, your room device may be connected to a service device, and the server handling these connections could be supporting hundreds of others simultaneously. Thus, any power disruption in your device can have ripple effects across the network. To avoid this, it’s crucial to try to use UPS due to your room device is connected to the service device, correct? This server is connected to over 470 devices, ensuring that your connection remains stable.

Protecting Your Data and Devices

In addition to keeping you connected, a UPS protects your devices from sudden power surges and outages. Sudden shutdowns can lead to data loss or even damage your hardware. Especially in situations where servers support hundreds of devices, the last thing you want is for your device to fail when it is connected to such a critical infrastructure. For this reason, try to use UPS due to your room device is connected to the service device, correct? This server is connected to over 470 devices. Having a reliable power backup ensures that your device will remain operational, even if the main power supply goes down.

Network Stability and Shared Resources

When multiple users share a network, like in a university campus or office environment, any interruption in one device can affect the entire network’s performance. This becomes especially important when a server is handling a large number of connections. If your room device is connected to the service device, and the server supports over 470 devices, any interruption can lead to delays, lags, or even complete disconnection for other users. To prevent this from happening, try to use UPS due to your room device is connected to the service device, correct? This server is connected to over 470 devices. This ensures that you don’t accidentally disrupt others’ work when the power fails.

Ensuring Seamless Work and Study Environment

Whether you’re working on an important project or attending an online class, the last thing you want is for your work to be interrupted by a power outage. In educational institutions or shared workspaces where numerous devices are connected to a central server, uninterrupted power is essential. Imagine losing your connection in the middle of a virtual meeting or exam simply because the power went out. This is why it’s essential to try to use UPS due to your room device is connected to the service device, correct? This server is connected to over 470 devices. By using a UPS, you ensure that your connection remains stable, and you don’t lose any progress.

Minimising Downtime and Avoiding Frustration

Downtime is not just an inconvenience; it can be costly in terms of productivity and time. In environments where multiple devices rely on a shared server, even a few seconds of power disruption can lead to significant downtime, affecting not just you but everyone connected to the same network. To avoid this, try to use UPS due to your room device is connected to the service device, correct? This server is connected to over 470 devices, as this will minimise the risk of downtime and ensure that everyone stays connected, regardless of power fluctuations.

Enhancing the Longevity of Your Devices

Power surges and sudden shutdowns can significantly shorten the lifespan of your electronic devices. When your device is part of a larger network, like in a shared workspace or academic environment, maintaining its longevity becomes even more critical. This is because your device’s performance affects not just you but potentially hundreds of other users. Therefore, to protect your device and ensure that it functions optimally for as long as possible, try to use UPS due to your room device is connected to the service device, correct? This server is connected to over 470 devices. Using a UPS will safeguard your device from electrical issues, prolonging its lifespan.

The Broader Impact on Network Health

Servers that handle large numbers of devices, such as those managing over 470 devices, require a consistent and reliable power supply to function effectively. Any disruption in the power supply to one device can cause issues throughout the network. This means that if your device loses power, it could affect the performance of the server and the other 470 devices connected to it. To prevent this from happening, try to use UPS due to your room device is connected to the service device, correct? This server is connected to over 470 devices. This small step can significantly improve the overall health and stability of the network.

Choosing the Right UPS for Your Needs

Now that you understand the importance of using a UPS, it’s essential to choose the right one for your specific needs. Depending on the power requirements of your device and the network infrastructure, you may need a higher-capacity UPS to ensure that everything remains powered during outages. When selecting a UPS, always consider the size and power demands of the server and the number of devices connected to it. Remember, try to use UPS due to your room device is connected to the service device, correct? This server is connected to over 470 devices, and choosing the right UPS will ensure optimal performance.

Conclusion: Why You Must Use a UPS

In conclusion, using a UPS is not just about keeping your device online; it’s about maintaining the stability and integrity of the entire network. When you’re part of a larger system, like a server that supports over 470 devices, your actions can have a ripple effect on everyone else. Therefore, it’s critical to try to use UPS due to your room device is connected to the service device, correct? This server is connected to over 470 devices. By doing so, you’ll ensure that both your device and the broader network continue to function without interruption, even during power outages.


 Hostel Room wifi When will the power go out to connect the hostel room wifi? It'll take around more than 20 minutes. If you want to uninterrupt the internet connection, please buy the modemups. 

                                                                 Click here to proceed with your purchase.                                                


Method for connecting to WiFi on an iPhone


To connect to the Amrita or Amrita Room wifi, simply click on the certificate and select the "trust" option. This will establish a connection to the Amrita or Amrita Room wifi network.


No comments:

Post a Comment

Windows Support

                                                     Windows 11 Offline User creation Click to Download Help PDF file How to create local us...